实现登录第三方网站
调用步骤
1.
2.
1.
2.
3.
4.
5.
准备工作
步骤一:创建并配置应用
2.
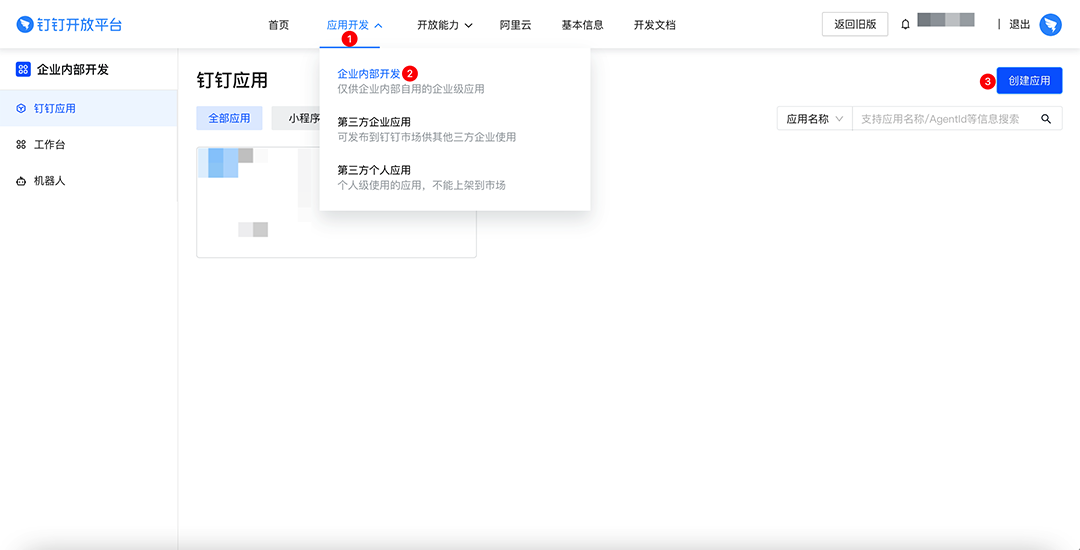
3.
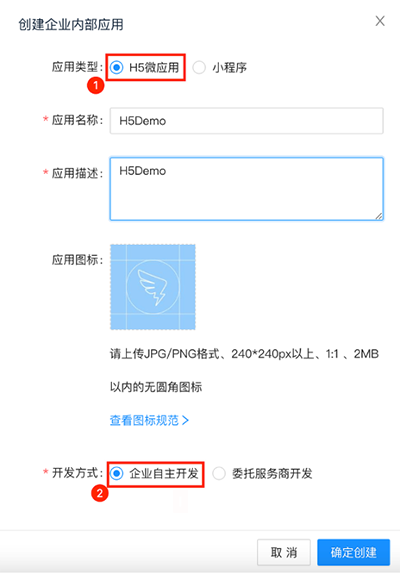
4.
5.
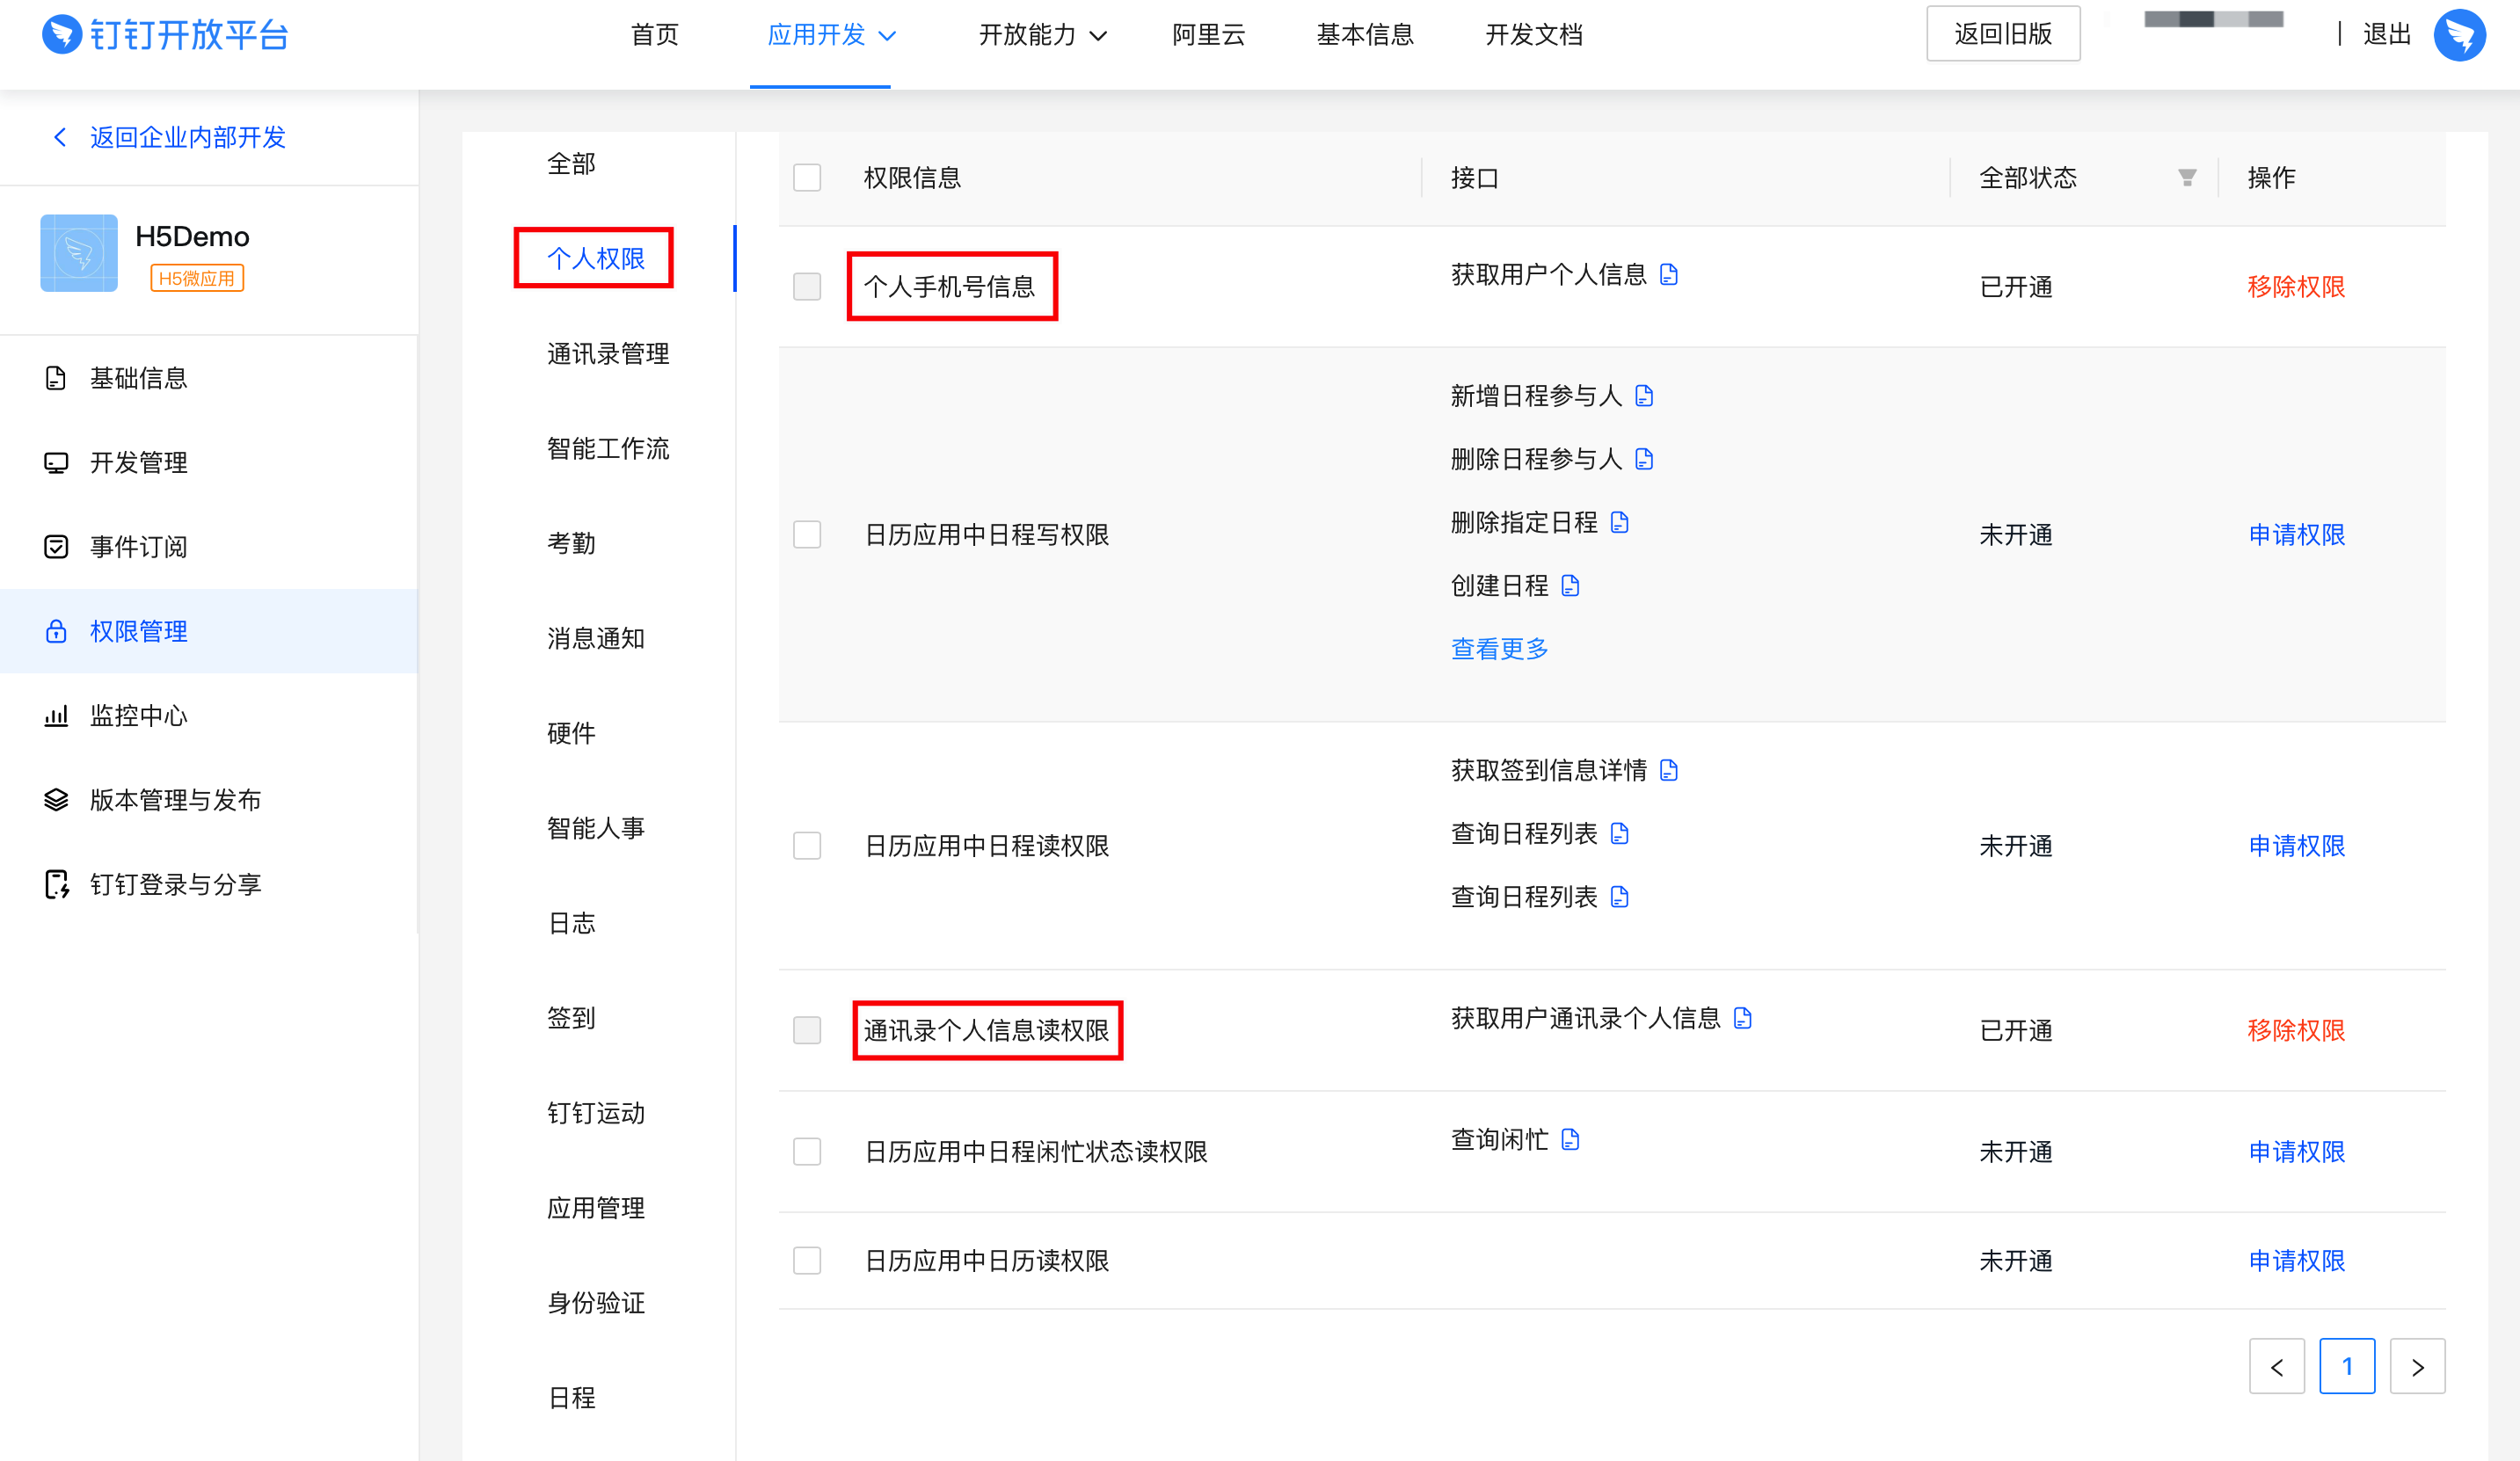
127.0.0.1。http://公网IP:8080。https://ding-doc.dingtalk.com/。步骤二:添加接口权限
步骤三:配置frp内网穿透
步骤四:设置第三方网站的回调域名
1.
2.

步骤五:搭建后端服务
1.
2.
1.
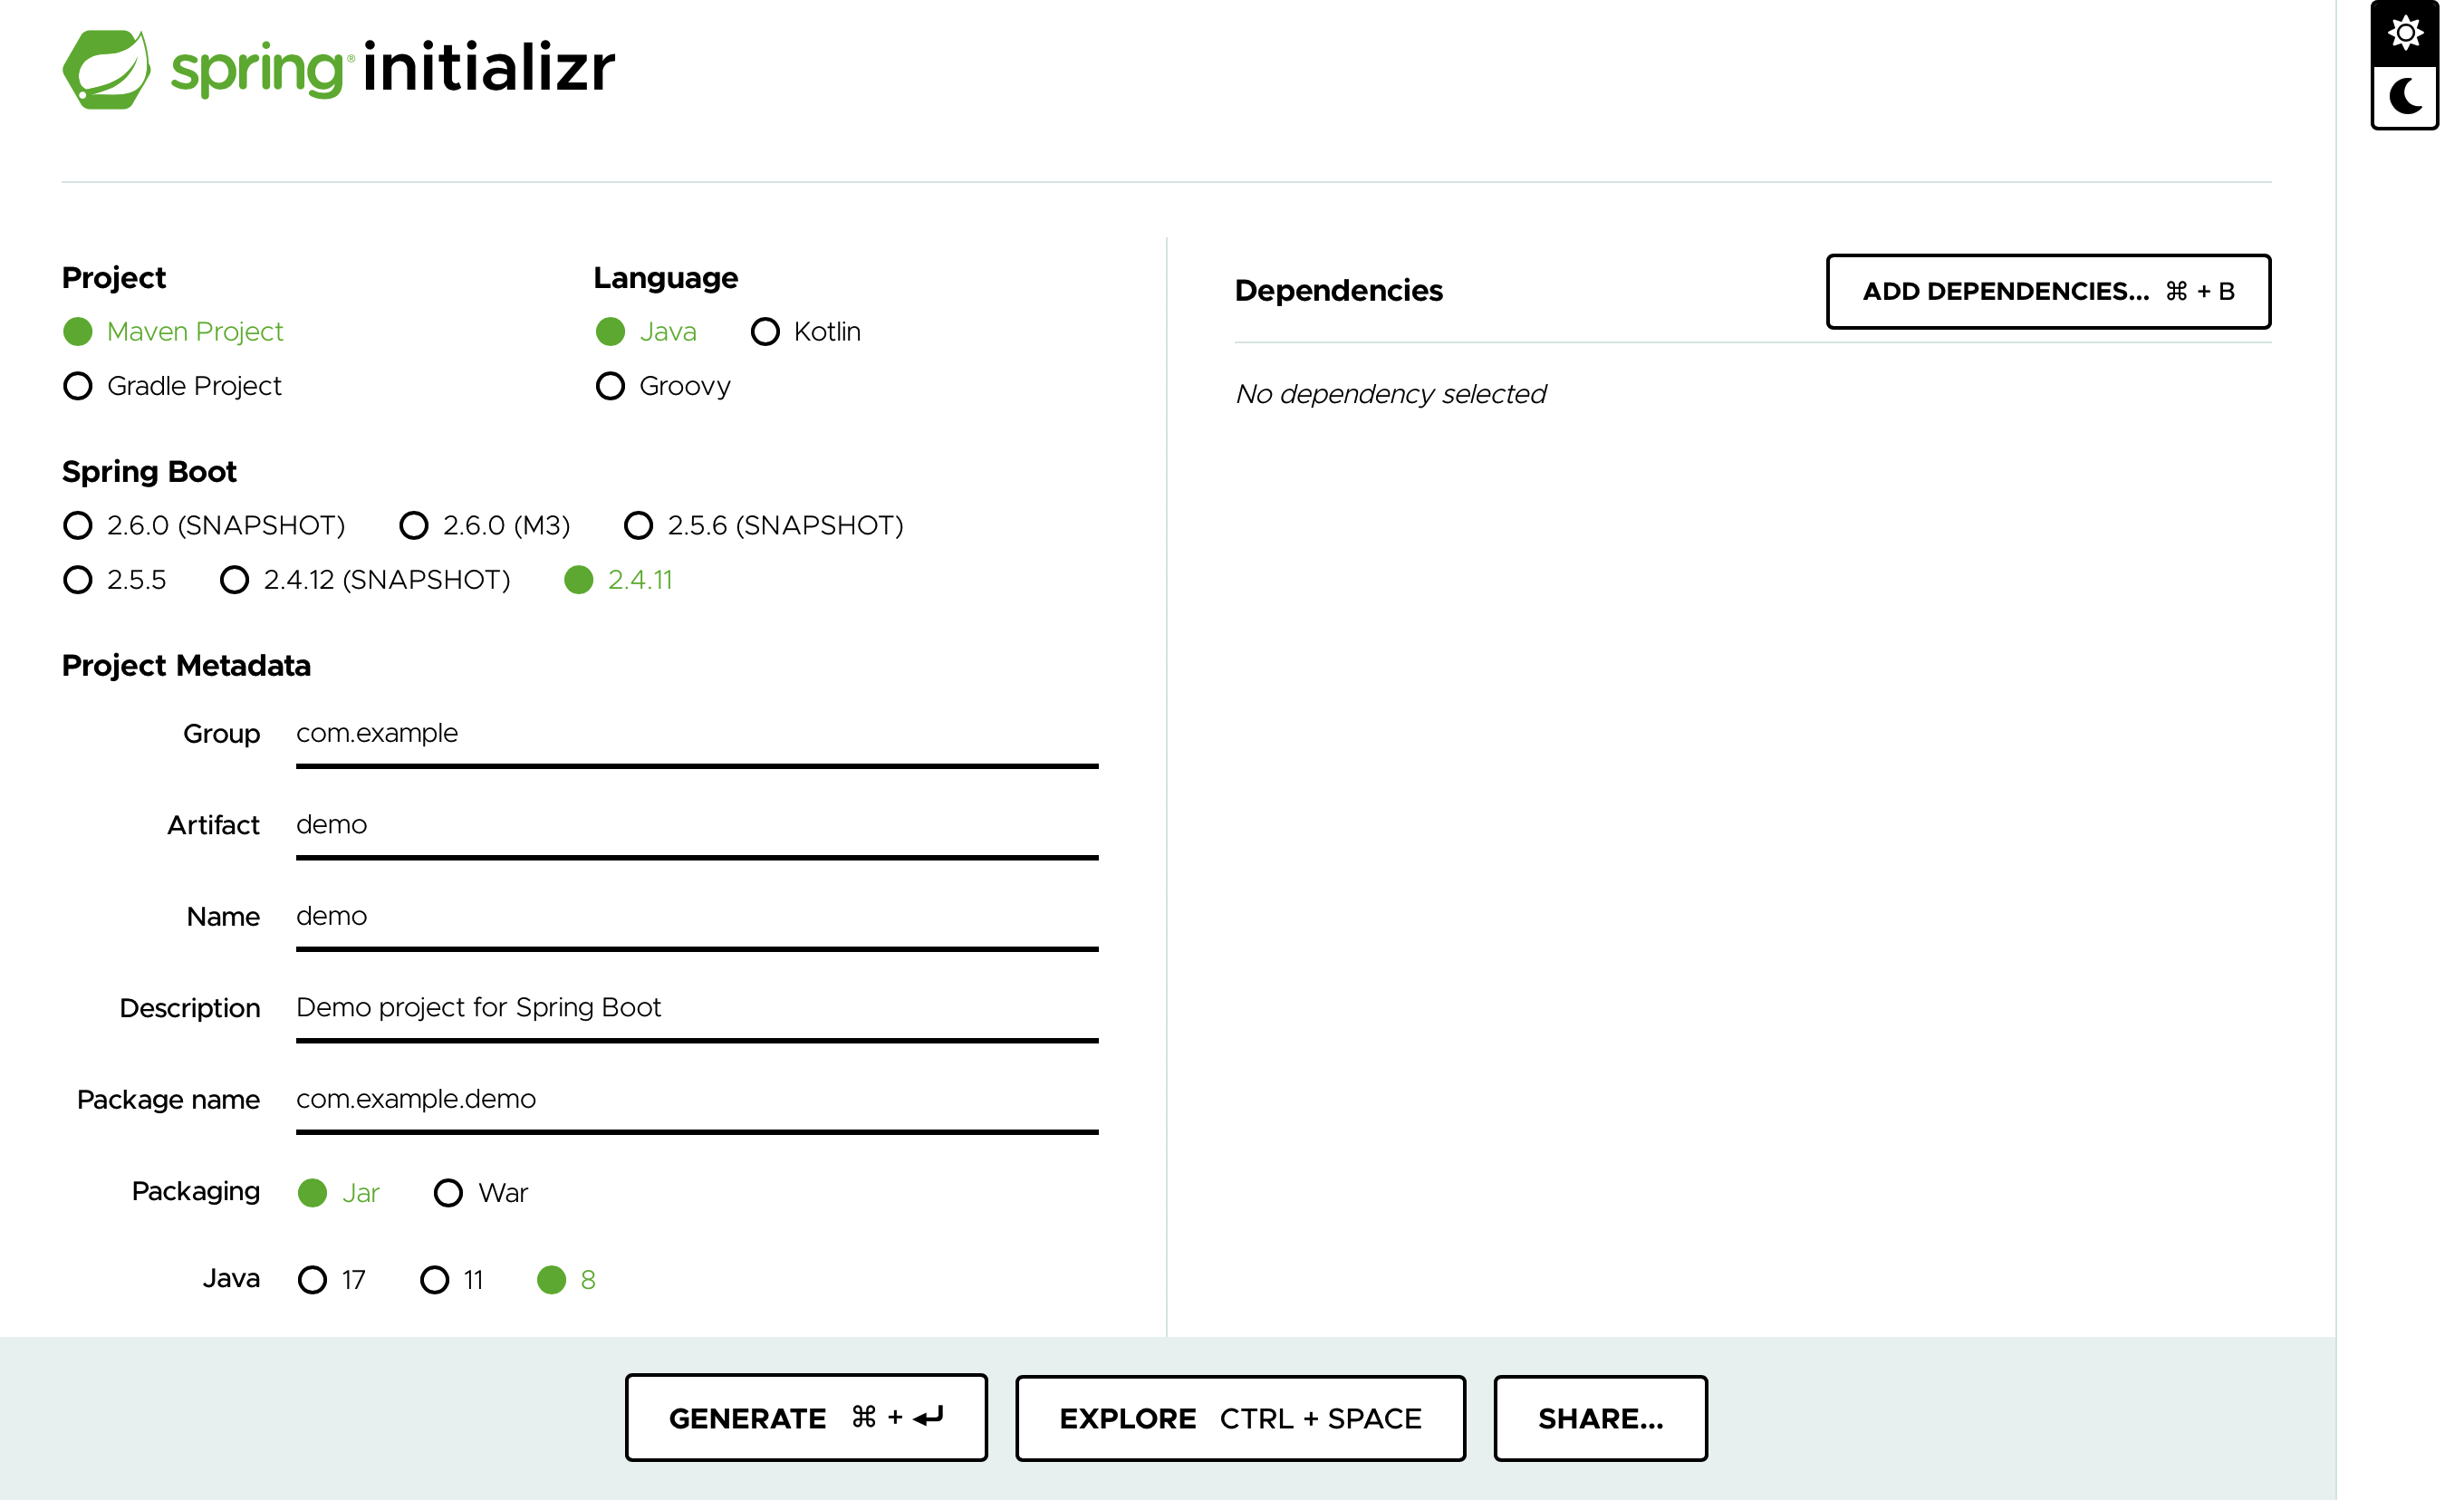
2.
3.
4.
<dependency>
      <groupId>org.springframework.boot</groupId>
      <artifactId>spring-boot-starter-web</artifactId>
 </dependency>
 <dependency>
      <groupId>com.alibaba</groupId>
      <artifactId>fastjson</artifactId>
      <version>1.2.6</version>
 </dependency>
 <dependency>
  <groupId>com.aliyun</groupId>
  <artifactId>dingtalk</artifactId>
  <version>1.1.86</version>
</dependency>5.
| 需替换内容 | 说明 |
|---|---|
| 接口地址/auth | 需要和开发者后台钉钉登录与分享的地址http:xxxxx/auth保持一致。 |
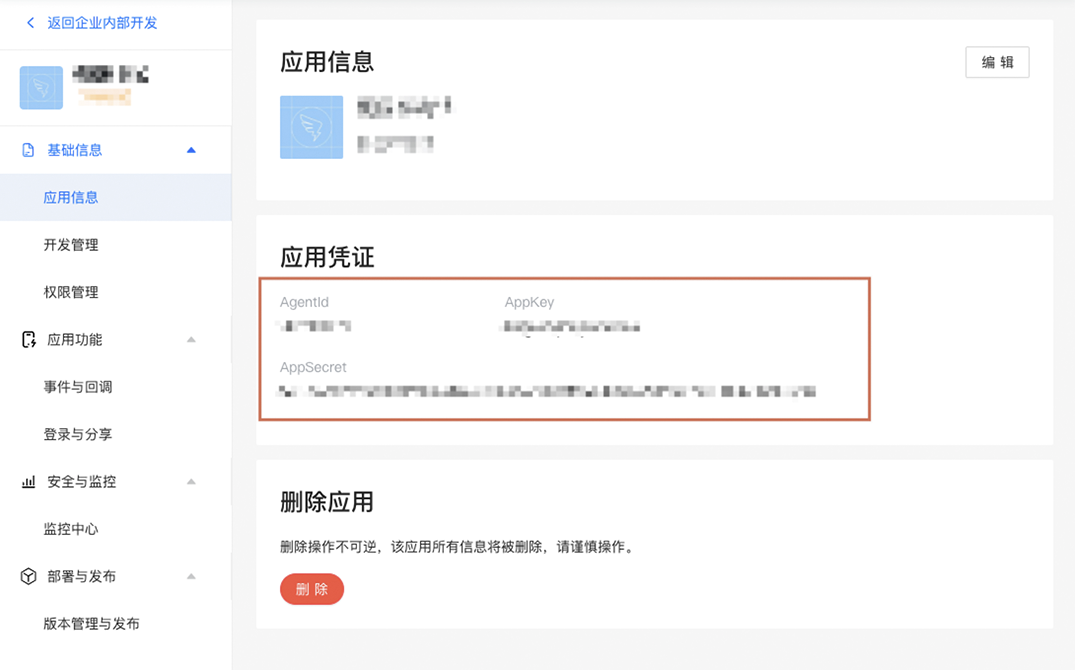
| setClientId("dingwxxxxx请替换为正确的应用信息的AppKey") | 参数务必替换为:应用基础信息-应用信息中的AppKey。 |
| setClientSecret("ICLbFFjNxxx请替换为正确的应用信息的AppSecret") | 参数务必替换为:应用基础信息-应用信息中的AppSecret。 |
package com.example.demo;
import com.alibaba.fastjson.JSON;
import com.aliyun.dingtalkcontact_1_0.models.GetUserHeaders;
import com.aliyun.dingtalkoauth2_1_0.models.GetUserTokenRequest;
import com.aliyun.dingtalkoauth2_1_0.models.GetUserTokenResponse;
import com.aliyun.teaopenapi.models.Config;
import com.aliyun.teautil.models.RuntimeOptions;
import org.springframework.web.bind.annotation.RequestMapping;
import org.springframework.web.bind.annotation.RequestMethod;
import org.springframework.web.bind.annotation.RequestParam;
import org.springframework.web.bind.annotation.RestController;
@RestController
public class LoginController {
public static com.aliyun.dingtalkoauth2_1_0.Client authClient() throws Exception {
Config config = new Config();
config.protocol = "https";
config.regionId = "central";
return new com.aliyun.dingtalkoauth2_1_0.Client(config);
}
/**
* 获取用户token
* @param authCode
* @return
* @throws Exception
*/
//接口地址:注意/auth与钉钉登录与分享的回调域名地址一致
@RequestMapping(value = "/auth", method = RequestMethod.GET)
public String getAccessToken(@RequestParam(value = "authCode")String authCode) throws Exception {
com.aliyun.dingtalkoauth2_1_0.Client client = authClient();
GetUserTokenRequest getUserTokenRequest = new GetUserTokenRequest()
//应用基础信息-应用信息的AppKey,请务必替换为开发的应用AppKey
.setClientId("dingwxxxxx请替换为正确的应用信息的AppKey")
//应用基础信息-应用信息的AppSecret,,请务必替换为开发的应用AppSecret
.setClientSecret("ICLbFFjNxxx请替换为正确的应用信息的AppSecret")
.setCode(authCode)
.setGrantType("authorization_code");
GetUserTokenResponse getUserTokenResponse = client.getUserToken(getUserTokenRequest);
//获取用户个人token
String accessToken = getUserTokenResponse.getBody().getAccessToken();
return getUserinfo(accessToken);
}
public static com.aliyun.dingtalkcontact_1_0.Client contactClient() throws Exception {
Config config = new Config();
config.protocol = "https";
config.regionId = "central";
return new com.aliyun.dingtalkcontact_1_0.Client(config);
}
/**
* 获取用户个人信息
* @param accessToken
* @return
* @throws Exception
*/
public String getUserinfo(String accessToken) throws Exception {
com.aliyun.dingtalkcontact_1_0.Client client = contactClient();
GetUserHeaders getUserHeaders = new GetUserHeaders();
getUserHeaders.xAcsDingtalkAccessToken = accessToken;
//获取用户个人信息,如需获取当前授权人的信息,unionId参数必须传me
String me = JSON.toJSONString(client.getUserWithOptions("me", getUserHeaders, new RuntimeOptions()).getBody());
System.out.println(me);
return me;
}
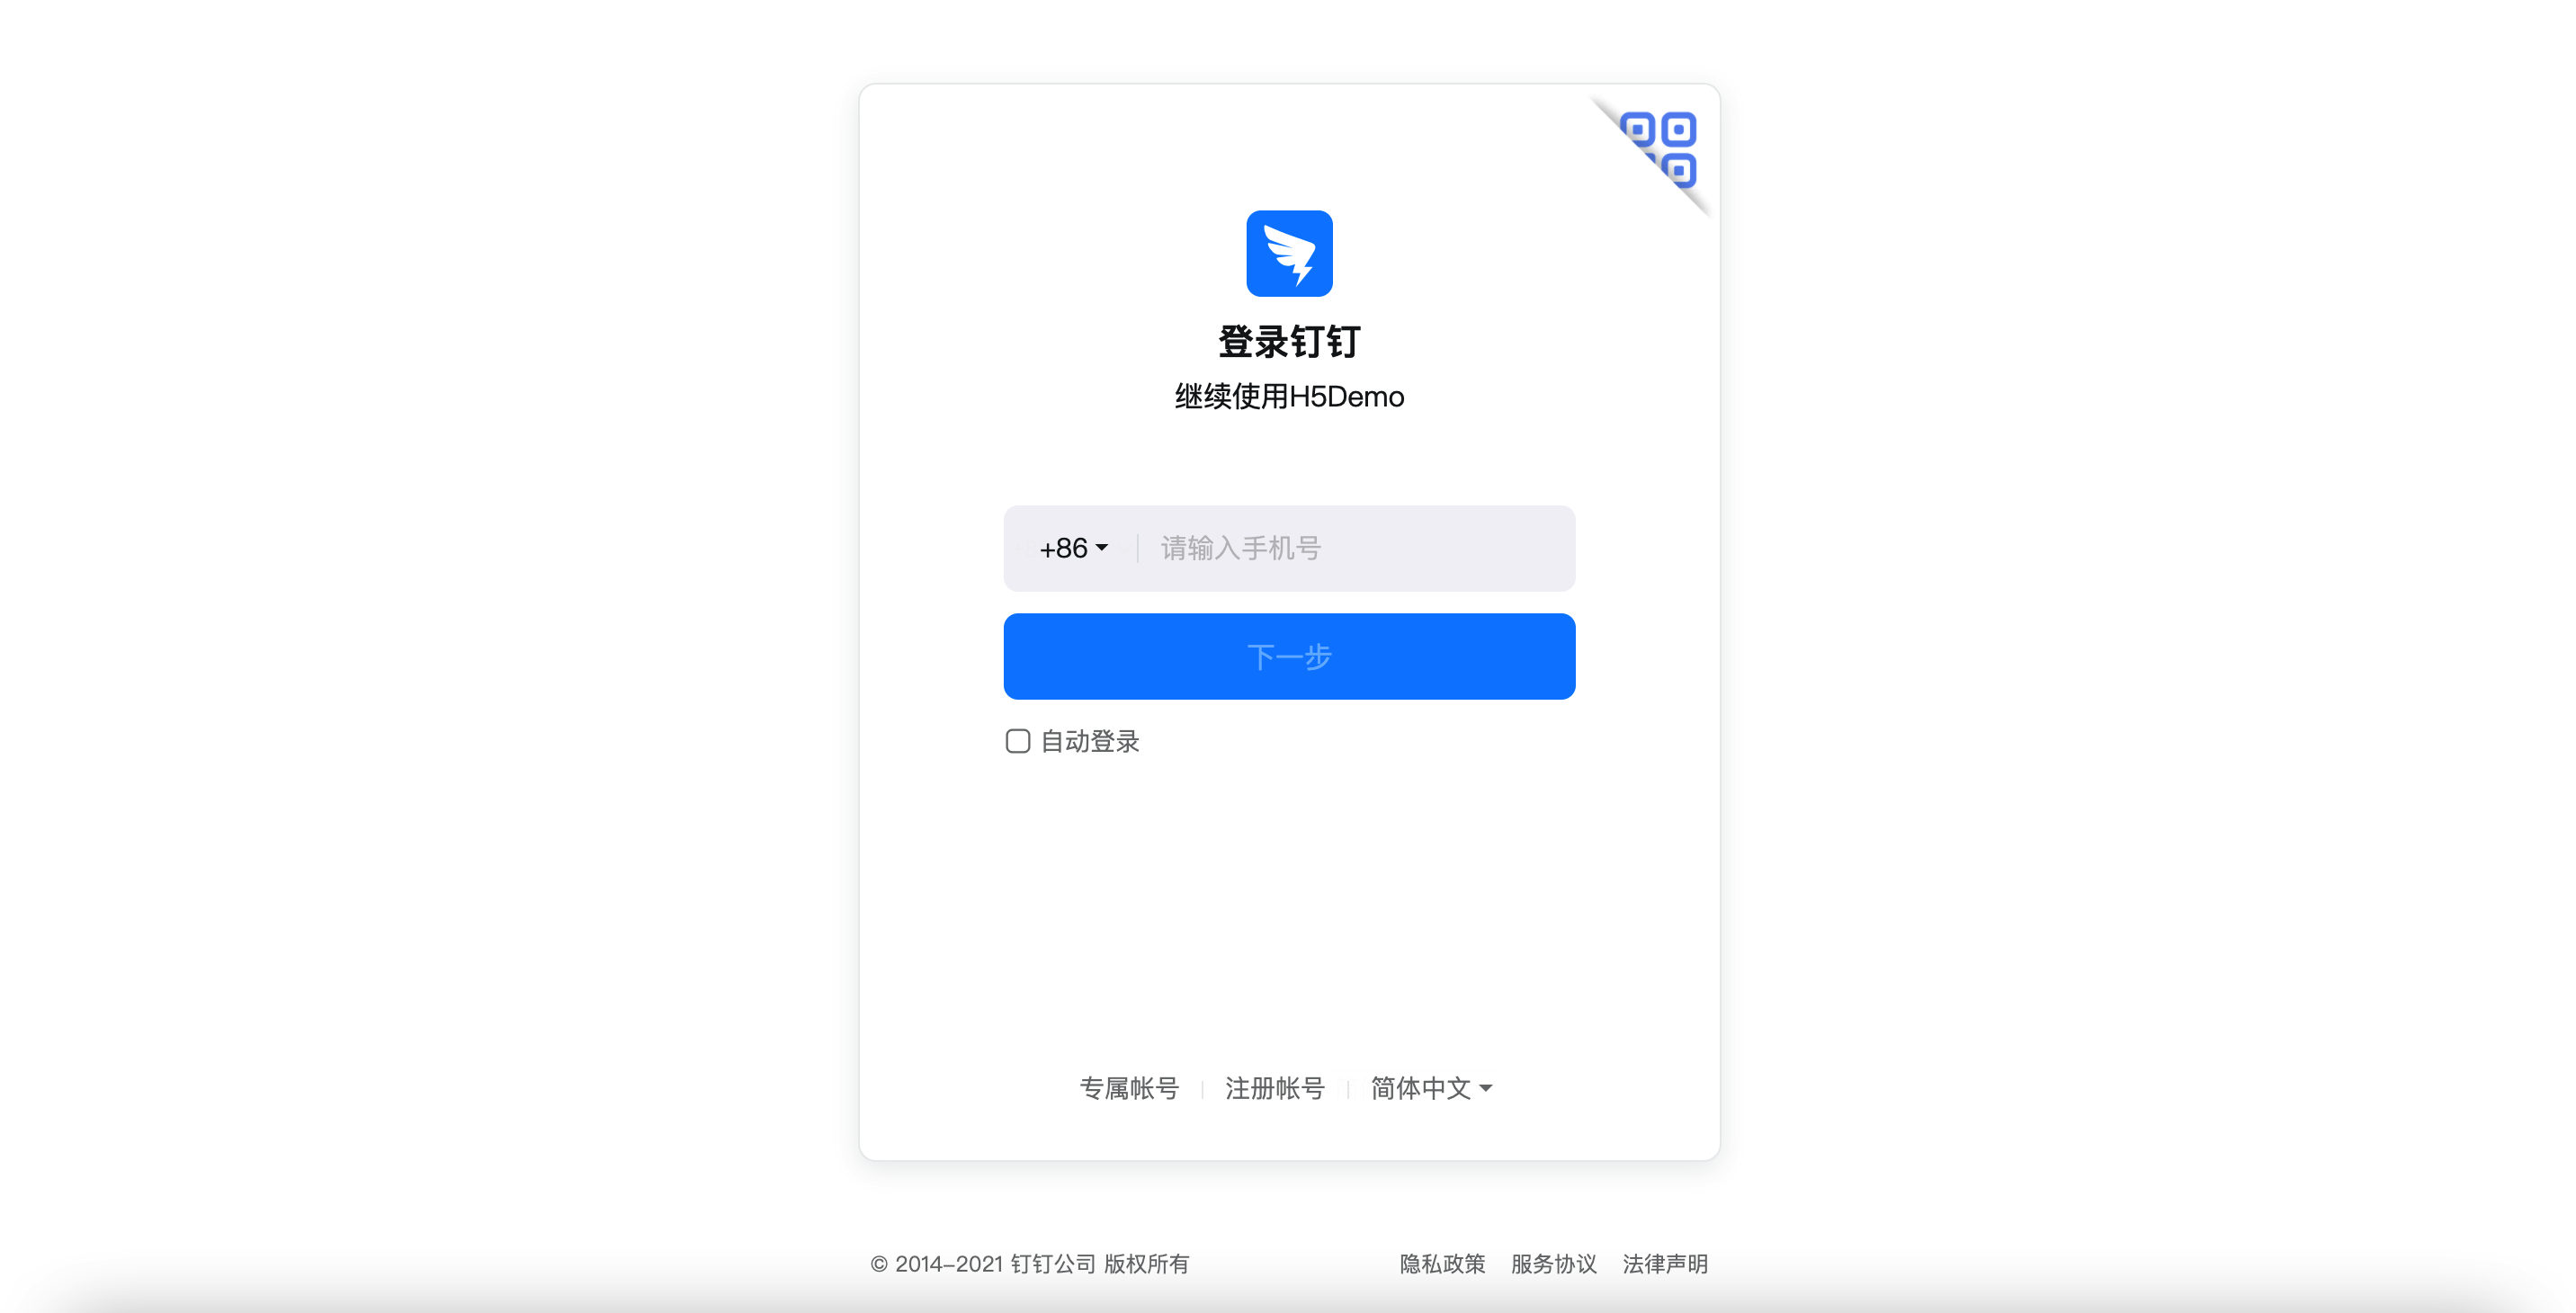
}步骤六:实现登录第三方网站
使用钉钉提供的页面登录授权
1.
https://login.dingtalk.com/oauth2/auth?
redirect_uri=https%3A%2F%2Fwww.aaaaa.com%2Fauth
&response_type=code
&client_id=dingxxxxxxx   //应用的AppKey
&scope=openid   //此处的openId保持不变
&state=dddd
&prompt=consent| 参数 | 是否必填 | 说明 |
|---|---|---|
| redirect_uri | 是 | 授权通过/拒绝后回调地址。重要需要与开发者后台钉钉登录与分享的地址保持一致,redirect_uri需要进行urlencode。 |
| response_type | 是 | 固定值为code。授权通过后返回authCode。 |
| client_id | 是 | 步骤一中创建的应用详情中获取。企业内部应用:client_id为应用的AppKey。第三方企业应用:client_id为应用的SuiteKey。 |
| scope | 是 | 授权范围,授权页面显示的授权信息以应用注册时配置的为准。当前只支持两种输入:openid:授权后可获得用户useridopenid corpid:授权后可获得用户id和登录过程中用户选择的组织id,空格分隔。注意url编码。 |
| state | 否 | 跟随authCode原样返回。 |
| prompt | 是 | 值为consent时,会进入授权确认页。 |
| org_type | 否 | 控制输出特定类型的组织列表,org_type=management 表示只输出有管理权限的组织。重要scope包含corpid时该参数存在意义。 |
| corpId | 否 | 用于指定用户需要选择的组织。重要scope包含corpid时该参数存在意义。传入的corpId需要是当前用户所在的组织。 |
| exclusiveLogin | 否 | true表示专属帐号登录,展示组织代码输入页。 |
| exclusiveCorpId | 否 | 开启了专属帐号功能的组织corpId。重要exclusiveLogin为true时,该参数表示直接进入该组织的登录页。exclusiveLogin为false时,该参数无意义。 |
内嵌二维码方式登录授权
1.
<script src="https://g.alicdn.com/dingding/h5-dingtalk-login/0.21.0/ddlogin.js"></script>2.
<!-- STEP1:在HTML中添加包裹容器元素 -->
<div id="self_defined_element" class="self-defined-classname"></div>
<style>
    /* STEP2:指定这个包裹容器元素的CSS样式,尤其注意宽高的设置 */
    .self-defined-classname {
        width: 300px;
        height: 300px;
    }
</style>
<script>
    // STEP3:在需要的时候,调用 window.DTFrameLogin 方法构造登录二维码,并处理登录成功或失败的回调。
    window.DTFrameLogin(
        {
            id: 'self_defined_element',
            width: 300,
            height: 300,
        },
        {
            redirect_uri: encodeURIComponent('http://www.aaaaa.com/a/b/'),
            client_id: 'dingxxxxxxxxxxxx',
            scope: 'openid',
            response_type: 'code',
            state: 'xxxxxxxxx',
            prompt: 'consent',
        },
        (loginResult) => {
            const {redirectUrl, authCode, state} = loginResult;
            // 这里可以直接进行重定向
            window.location.href = redirectUrl;
            // 也可以在不跳转页面的情况下,使用code进行授权
            console.log(authCode);
        },
        (errorMsg) => {
            // 这里一般需要展示登录失败的具体原因
            alert(`Login Error: ${errorMsg}`);
        },
    );
</script>// ********************************************************************************
// window.DTFrameLogin方法定义
// ********************************************************************************
window.DTFrameLogin: (
frameParams: IDTLoginFrameParams, // DOM包裹容器相关参数
loginParams: IDTLoginLoginParams, // 统一登录参数
successCbk: (result: IDTLoginSuccess) => void, // 登录成功后的回调函数
errorCbk?: (errorMsg: string) => void, // 登录失败后的回调函数
) => void;
// ********************************************************************************
// DOM包裹容器相关参数
// ********************************************************************************
// 注意!width与height参数只用于设置二维码iframe元素的尺寸,并不会影响包裹容器尺寸。
// 包裹容器的尺寸与样式需要接入方自己使用css设置
interface IDTLoginFrameParams {
id: string; // 必传,包裹容器元素ID,不带'#'
width?: number; // 选传,二维码iframe元素宽度,最小280,默认300
height?: number; // 选传,二维码iframe元素高度,最小280,默认300
}
// ********************************************************************************
// 统一登录参数
// ********************************************************************************
// 参数意义与“拼接链接发起登录授权”的接入方式完全相同(缺少部分参数)
// 增加了isPre参数来设定运行环境
interface IDTLoginLoginParams {
redirect_uri: string; // 必传,注意url需要encode
response_type: string; // 必传,值固定为code
client_id: string; // 必传
scope: string; // 必传,如果值为openid+corpid,则下面的org_type和corpId参数必传,否则无法成功登录
prompt: string; // 必传,值为consent。
state?: string; // 选传
org_type?: string; // 选传,当scope值为openid+corpid时必传
corpId?: string; // 选传,当scope值为openid+corpid时必传
exclusiveLogin?: string; // 选传,如需生成专属组织专用二维码时,可指定为true,可以限制非组织帐号的扫码
exclusiveCorpId?: string; // 选传,当exclusiveLogin为true时必传,指定专属组织的corpId
}
// ********************************************************************************
// 登录成功后返回的登录结果
// ********************************************************************************
interface IDTLoginSuccess {
redirectUrl: string; // 登录成功后的重定向地址,接入方可以直接使用该地址进行重定向
authCode: string; // 登录成功后获取到的authCode,接入方可直接进行认证,无需跳转页面
state?: string; // 登录成功后获取到的state
}步骤七:访问第三方网站地址
1.
2.


        /**
     * 获取用户token
     * @param authCode
     * @return
     * @throws Exception
     */
    //接口地址:注意/auth与钉钉登录与分享的回调域名地址一致
    @RequestMapping(value = "/auth", method = RequestMethod.GET)
    public String getAccessToken(@RequestParam(value = "authCode")String authCode) throws Exception {
        com.aliyun.dingtalkoauth2_1_0.Client client = authClient();
        GetUserTokenRequest getUserTokenRequest = new GetUserTokenRequest()

                //应用基础信息-应用信息的AppKey,请务必替换为开发的应用AppKey
                .setClientId("dingwxxxxx请替换为正确的应用信息的AppKey")

                //应用基础信息-应用信息的AppSecret,,请务必替换为开发的应用AppSecret
                .setClientSecret("ICLbFFjNxxx请替换为正确的应用信息的AppSecret")
                .setCode(authCode)
                .setGrantType("authorization_code");
        GetUserTokenResponse getUserTokenResponse = client.getUserToken(getUserTokenRequest);
        //获取用户个人token
        String accessToken = getUserTokenResponse.getBody().getAccessToken();
        return  getUserinfo(accessToken);

} /**
* 获取用户个人信息
* @param accessToken
* @return
* @throws Exception
*/
public String getUserinfo(String accessToken) throws Exception {
com.aliyun.dingtalkcontact_1_0.Client client = contactClient();
GetUserHeaders getUserHeaders = new GetUserHeaders();
getUserHeaders.xAcsDingtalkAccessToken = accessToken;
//获取用户个人信息,如需获取当前授权人的信息,unionId参数必须传me
String me = JSON.toJSONString(client.getUserWithOptions("me", getUserHeaders, new RuntimeOptions()).getBody());
System.out.println(me);
return me;
}


 扫码加入交流群
修改于 2024-01-08 06:07:16