当项目中存在多个模块或多个版本的接口时,使用 Swagger 接口分组功能可以更好地组织和管理这些接口。例如,一个项目中有用户模块、订单模块和产品模块,我们可以使用接口分组将这些接口进行分组,使得文档更加清晰和易于查找。
Swagger 接口分组的用法
在 Swagger 中,我们可以通过添加 @Api 注解来配置接口分组。这个注解需要添加在控制器类上,用于表明该控制器属于哪个分组。在注解中,我们可以指定分组的名称和描述信息。也可以在 Swagger 配置文件中(如 SwaggerConfig.java 或 SwaggerConfig.xml)添加多个 Group 对象,每个 Group 对象表示一个分组。
在 Swagger Editor 中的实践案例
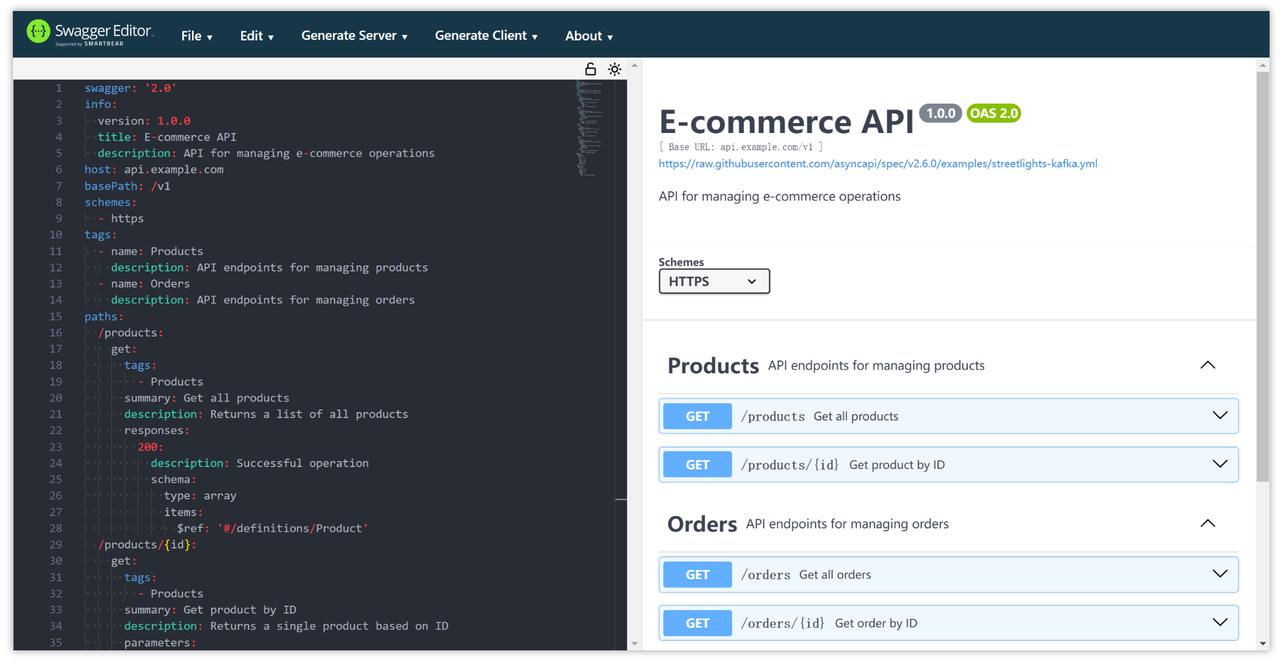
以下是一个可以在 Swagger Editor 中运行的 Swagger 分组的实践案例:
swagger: '2.0'
info:
  version: 1.0.0
  title: E-commerce API
  description: API for managing e-commerce operations
host: api.example.com
basePath: /v1
schemes:
  - https
tags:
  - name: Products
    description: API endpoints for managing products
  - name: Orders
    description: API endpoints for managing orders
paths:
  /products:
    get:
      tags:
        - Products
      summary: Get all products
      description: Returns a list of all products
      responses:
        200:
          description: Successful operation
          schema:
            type: array
            items:
              $ref: '#/definitions/Product'
  /products/{id}:
    get:
      tags:
        - Products
      summary: Get product by ID
      description: Returns a single product based on ID
      parameters:
        - name: id
          in: path
          description: ID of the product to retrieve
          required: true
          type: string
      responses:
        200:
          description: Successful operation
          schema:
            $ref: '#/definitions/Product'
  /orders:
    get:
      tags:
        - Orders
      summary: Get all orders
      description: Returns a list of all orders
      responses:
        200:
          description: Successful operation
          schema:
            type: array
            items:
              $ref: '#/definitions/Order'
  /orders/{id}:
    get:
      tags:
        - Orders
      summary: Get order by ID
      description: Returns a single order based on ID
      parameters:
        - name: id
          in: path
          description: ID of the order to retrieve
          required: true
          type: string
      responses:
        200:
          description: Successful operation
          schema:
            $ref: '#/definitions/Order'
definitions:
  Product:
    type: object
    properties:
      id:
        type: string
      name:
        type: string
      price:
        type: number
      category:
        type: string
  Order:
    type: object
    properties:
      id:
        type: string
      customer:
        type: string
      products:
        type: array
        items:
          $ref: '#/definitions/Product'
这个例子定义了一个名为 E-commerce API 的 Swagger 文档,并进行了分组。在标签(tags)部分定义了两个分组:Products 和 Orders。每个分组下面分别有对应的接口,用于管理商品和订单。
你可以将上述代码复制到 Swagger Editor 中,即可查看 API 文档的可视化界面。在"Tags"栏中可以选择不同的分组,看到对应的接口和数据模型。并且可以根据定义的接口和数据模型进行测试和调试。
在 SpringBoot 中的配置
假设我们正在用 SpringBoot 构建一个电商网站的后端接口,其中包含商品管理和订单管理两个模块。我们可以使用 Swagger 分组来管理这两个模块的接口。
- 首先,在 Swagger 配置文件中定义两个分组:
@Configuration
@EnableSwagger2
public class SwaggerConfig {

    @Bean
    public Docket productApi() {
        return new Docket(DocumentationType.SWAGGER_2)
                .groupName("商品管理")
                .select()
                .apis(RequestHandlerSelectors.basePackage("com.example.api.product"))
                .paths(PathSelectors.any())
                .build();
    }

    @Bean
    public Docket orderApi() {
        return new Docket(DocumentationType.SWAGGER_2)
                .groupName("订单管理")
                .select()
                .apis(RequestHandlerSelectors.basePackage("com.example.api.order"))
                .paths(PathSelectors.any())
                .build();
    }

    // 其他配置...
}
在这个例子中,我们定义了两个分组:"商品管理"和"订单管理"。分别指定了对应模块的包路径。
2. 在接口中使用@Api 注解指定接口所属的分组:
@RestController
@RequestMapping("/products")
@Api(tags = "商品管理") // 使用@Api注解指定接口所属的分组
public class ProductController {

    // 接口方法...

}

@RestController
@RequestMapping("/orders")
@Api(tags = "订单管理") // 使用@Api注解指定接口所属的分组
public class OrderController {

    // 接口方法...

}
在这个例子中,我们在 ProductController 和 OrderController 的类上使用了@Api 注解,指定了它们所属的分组。
3. 启动项目后可以访问不同分组的接口文档:
- 商品管理模块的接口文档:http://localhost:8080/swagger-ui.html#/商品管理
- 订单管理模块的接口文档:http://localhost:8080/swagger-ui.html#/订单管理
通过访问不同路径可以访问不同分组的接口文档。
注意事项
使用接口分组功能时,需要注意以下几点:
- 分组名称应该简明扼要,能够准确描述该组接口的用途。
- 每个控制器类仅能属于一个分组,但可以在一个控制器类中包含多个接口。
- 注意避免重复的分组名称,以免混淆和误解。
常见的问题及解决方法
- 为什么接口没有分组显示?
确保每个控制器类都添加了 @Api 注解,并指定了正确的分组名称。
2. 如何更改接口分组的显示顺序?
可以通过在 @Api 注解中指定 position 属性来指定分组的显示顺序,数值越小越靠前。
Swagger 和 Apifox 整合
Swagger 管理接口有时很不方便,缺乏一定的安全性和团队间的分享协作,所以我更推荐使用 Apifox 的 IDEA 插件。你可以在 IDEA 中自动同步 Swagger 注解到 Apifox,一键生成接口文档,多端同步,非常方便测试和维护,这样就可以迅速分享 API 给其他小伙伴。
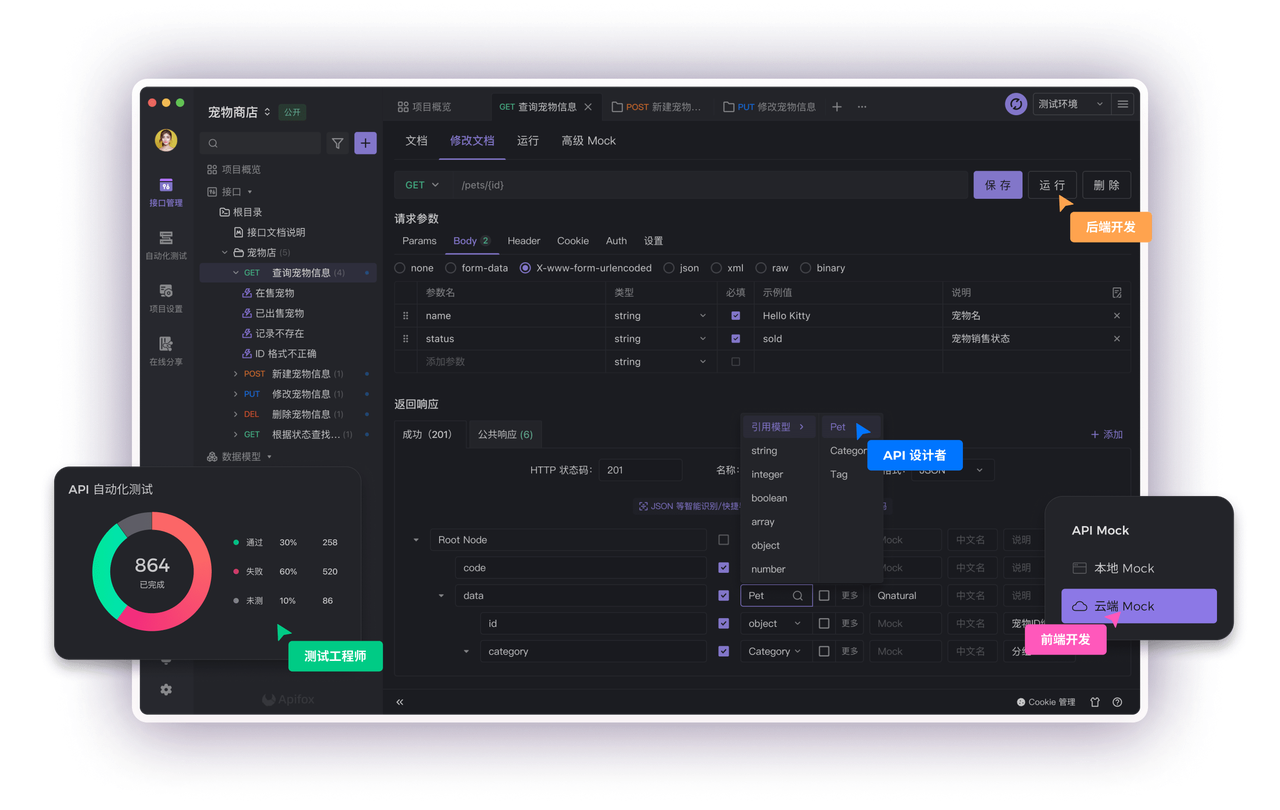
Apifox 是一个比 Postman 更强大的接口测试工具,Apifox = Postman + Swagger + Mock + JMeter,Apifox 支持调试 http(s)、WebSocket、Socket、gRPC、Dubbo 等协议的接口,并且集成了 IDEA 插件。
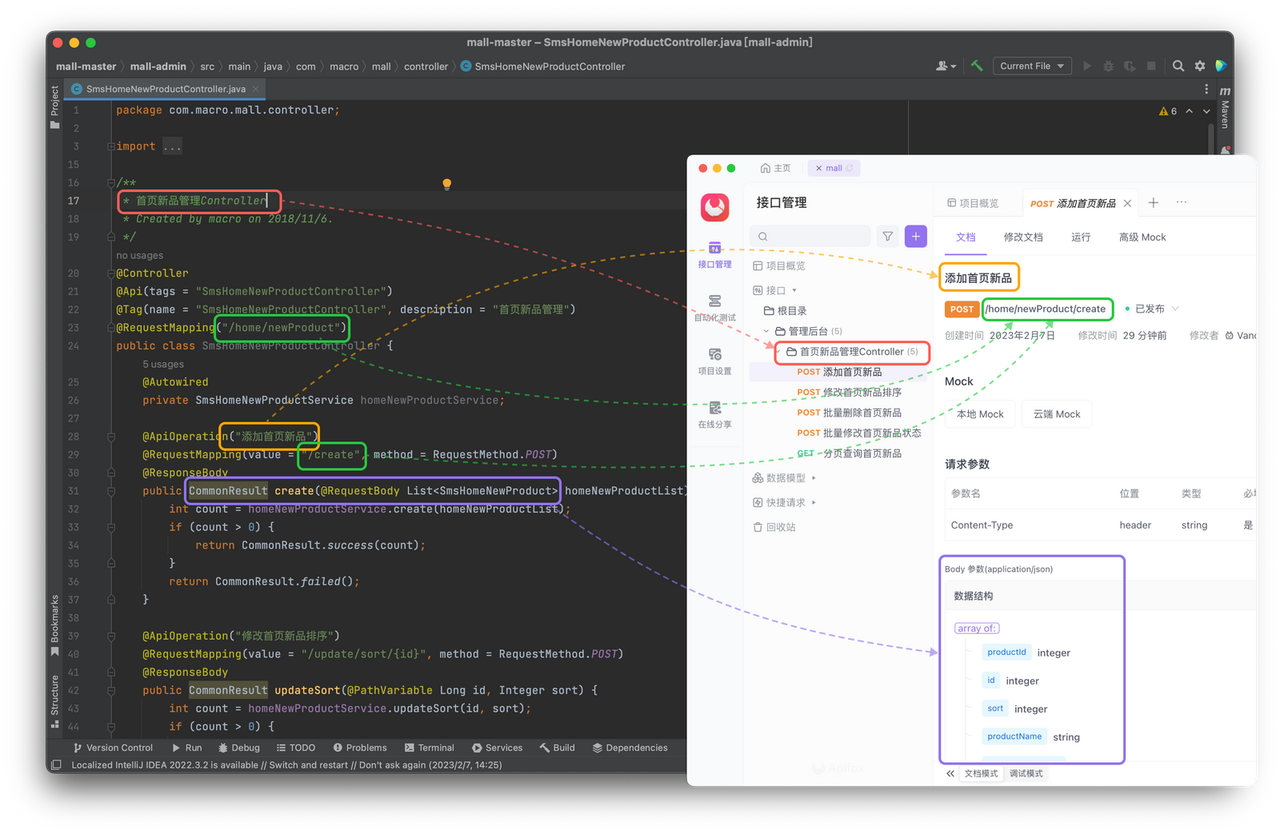
Apifox 的 IDEA 插件可以自动解析代码注释,并基于 Javadoc、KDoc 和 ScalaDoc 生成 API 文档。通过 IntelliJ IDEA 的 Apifox Helper 插件,开发人员可以在不切换工具的情况下将他们的文档与 Apifox 项目同步。
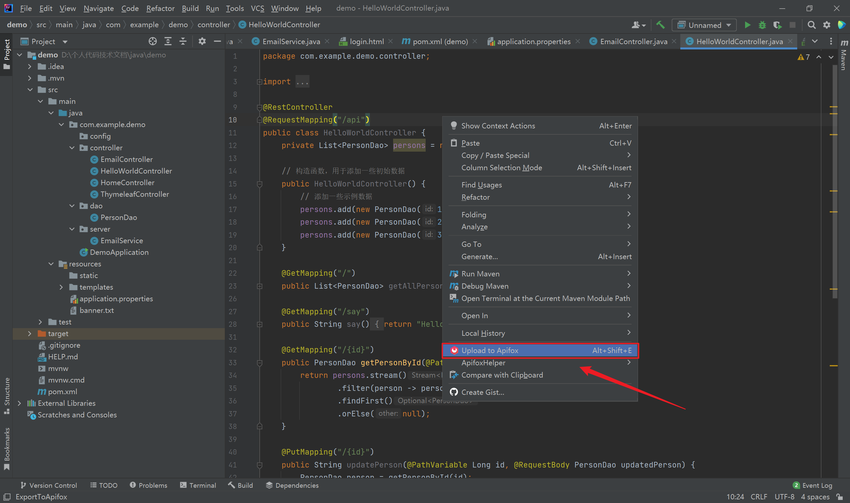
当在 IDEA 项目中有接口信息变动,只需右键点击「 Upload to Apifox」一键即可完成同步,无需奔走相告。团队成员可在 Apifox 中看到同步后的最新内容。
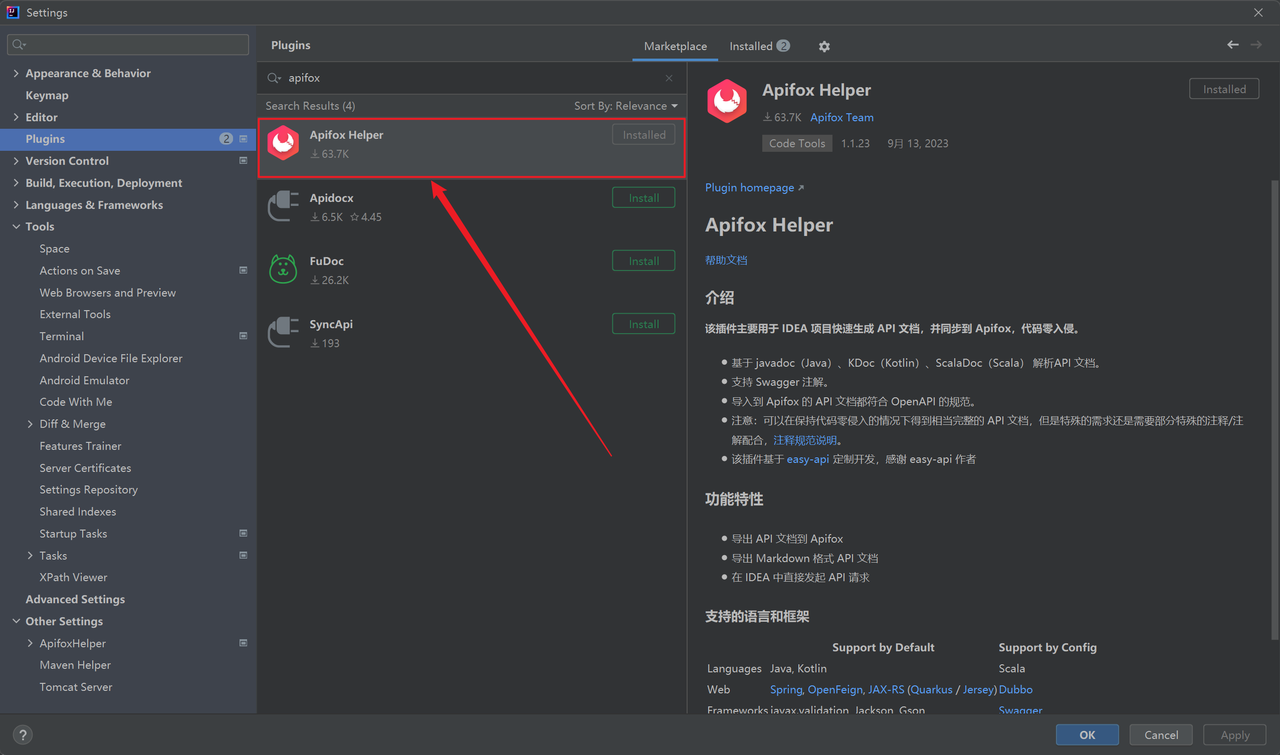
现在出发去 JetBrains 插件市场 下载试试吧!或直接在 IDEA 内 「plugin」入口直接搜索 Apifox Helper。
知识扩展:
参考链接:
- 官方文档:https://swagger.io/docs/specification/api-grouping/
- Springfox( Swagger for Spring Boot) : https://springfox.github.io/springfox/docs/current/