原文链接:https://dev.to/eunovo/a-better-way-to-create-swagger-docs-for-koa-apis-with-decorators-e3m作者:Oghenovo Usiwoma
最近,我需要为一个 Koa API 设置 Swagger 文档,并且我不得不将大量的信息和定义塞进注释中,以便 swagger-jsdoc 工具可以提取。作为一个使用过 NestJS 并且熟悉如何轻松创建 Swagger 文档的开发者,我不喜欢这种经历。我确实查找了一些替代方案,并找到了一个著名的包 koa-swagger-decorator,但为什么不重新发明轮子呢 ?我只是想自己编写这个...幸运的是,我不费吹灰之力就得到了可用的东西,但这很容易变成一种糟糕的情况,我只是浪费了时间和精力,而不是使用现有的解决方案。
所以,我想要的是类似于 NestJS 提供的东西;我想要创建表示各种定义的类,并且我想要使用装饰器为其属性添加 swagger 特定信息,轻而易举...
这是我对定义的想法的一个示例...
@Definition()
export class CreateUser {
    @ApiProperty({
        required: true,
        type: 'string'
    })
    createdBy!: string

    @ApiProperty({
        required: true,
        type: 'string'
    })
    username!: string

    @ApiProperty({
        required: true,
        type: 'string'
    })
    city!: string
}
创建装饰器非常简单,你只需要阅读一下 TypeScript 文档,但我大部分时间都跳过了这一步,这在后面让我后悔了,但让我们继续。
装饰器的工作原理
装饰器是一个可以附加到类、方法、属性等的函数,并在运行时调用,提供有关所附加到的声明的详细信息(让我们称之为装饰实体)。您还可以在运行时修改装饰实体。关于装饰器有几点需要注意的地方:
- 当一个类中有多个装饰器时,参数装饰器、方法/属性装饰器和类装饰器按顺序依次进行评估
- 当一个实体上有多个装饰器时,它们从上到下进行评估,并将结果从下到上传递这只是一个简化的解释,更多信息请查看装饰器组合。
创建"ApiProperty"和"Definition"装饰器
我们需要存储每个定义的必填字段、属性类型、示例等信息。我决定一个"@ApiProperty"就足够了,"@Definition"将被添加到类中,将所有收集到的信息编译成一个定义,并添加到我们的定义列表中... 请参考下面的代码片段。
export const DEFINITIONS: any = {}; // 用于保存所有定义
let DEFINITION: any = {}; // 当前定义的详细信息

// 类装饰器
export function Definition() {
    return function <T extends { new(...args: any[]): {} }>(constructor: T) {
        DEFINITIONS[constructor] = {
            name: constructor.name,
            type: "object",
            ...DEFINITION
        };
        DEFINITION = {}; // 准备下一个类
    }
}
为什么我使用类构造函数作为 Definition 对象的键?我们将在下一节中看到...
export interface ApiPropertyProps {
    required?: boolean
    type: string
    example?: string
    items?: { $ref?: any }
}

// 返回实际装饰器的函数,装饰器工厂
export function ApiProperty(props: ApiPropertyProps) {
    return function (_target: any, propertyKey: string) {
        if (!DEFINITION.required) DEFINITION.required = [];
        if (!DEFINITION.properties) DEFINITION.properties = {};

        if (props.required) DEFINITION.required.push(propertyKey);
        if (props.items?.$ref) props.items.$ref = toSwaggerRef(props.items.$ref); // 将引用转换为swagger引用格式

        DEFINITION.properties = { ...DEFINITION.properties, [propertyKey]: props };
    }
}
控制器
现在,我们不能只使用 koa-router 来定义路由,因为我们只能在类中使用装饰器。所以,我们需要创建控制器类,并创建装饰器来添加路径、参数和响应定义。我最终得到了这样的东西...
class UserController {
    @ApiParameter({ in: 'body', schema: { $ref: CreateUser } })
    @ApiResponse({ status: 200, type: 'application/json', schema: { $ref: CreateUser } })
    @ApiOperation({ path: '/user/create', method: 'post' })
    async createUser(ctx: Context) {
        const body: CreateGroup = ctx.request.body;
        console.log(body);
    }
}
如果你担心添加中间件,很容易为此目的创建一个"Middleware"装饰器。
注意,$ref指向实际的CreateUser类。我这样做是为了确保应用于CreateUser的装饰器在运行时实际执行。如果没有这个限制,我将不得不找到其他方法来确保CreateUser实际上被添加到定义中。
下面显示的toSwaggerRef函数将负责将这些类引用转换为 swagger 可以解释的"#/definitions/CreateUser"字符串。
function toSwaggerRef(ref: any) {
    if (ref.charAt) return ref; // 快速检查ref是否为字符串
    const definition = DEFINITIONS[ref];
    return `#/definitions/${definition.name}`;
}
"ApiParameter"和"ApiResponse"装饰器的代码非常标准,你可以在 github gist 中查看它们。对于"@ApiOperation",我稍微修改了装饰方法的实例,以便更容易使用 koa-router 将路由添加到 koa 中。
export interface ApiOperationProps {
    path: string, // Api路径
    method: Methods, // Http方法
    description?: string
    consumes?: string[]
}

export function ApiOperation(props: ApiOperationProps) {
    const swaggerPath = props.path.split('/')
        .map(token => {
            if (!token.startsWith(':')) return token;
            return `{${token.slice(1)}}`;
        })
        .join('/'); // 将所有':param'转换为'{param}'以供swagger使用

    PATHS[swaggerPath] = {
        [props.method]: {
            description: props.description,
            consumes: props.consumes,
            parameters: PARAMETERS,
            responses: RESPONSES
        }
    }
    PARAMETERS = [];
    RESPONSES = {};

    return (target: any, propertyKey: string, _descriptor: PropertyDescriptor) => {
        // target是带有装饰属性的实例
        if (!target._paths) target._paths = [];
        target._paths.push({
            path: props.path,
            method: props.method, // method as in Http Method
            propertyKey
        });
    }
}
将所有内容整合在一起
将路由添加到 koa 中,然后生成 swagger 文档。
export function applyRoutes(controller: any, router: Router) {
    if (!controller._paths) return;

    // 还记得我们在@ApiOperation装饰器中添加的路径吗?
    controller._paths.forEach((pathObj: any) => {
        const { path, method, propertyKey } = pathObj;
        router[method as Methods](path, controller[propertyKey]); // 注册路由
    });
}
在我们的控制器文件中,在定义完控制器类之后,我们只需要这样做:
const router = new Router();
const users = new UserController();
applyRoutes(users, router);

export default router; // 将其添加到koa应用中
为了获得我们的 swagger 页面,我使用了这个工具 swagger2-koa,它接受任何遵循 swagger 规范的对象。
swaggerDoc函数将路径和定义编译成一个遵循 swagger 规范的对象。
export interface SwaggerProps {
    info: {
        title: string,
        version: string,
        description: string
    }
}

export function swaggerDoc(props: SwaggerProps) {
    const definitions = getDefinitions(); // 将我们的DEFINITIONS对象解析为swagger格式

    return {
        swagger: "2.0",
        info: props.info,
        paths: PATHS,
        definitions,
        responses: {},
        parameters: {},
        securityDefinitions: {},
        tags: {}
    };
}
最后...
import { ui } from 'swagger2-koa';
import { swaggerDoc } from './utils/swagger';

let swaggerSpec: any = swaggerDoc({
    info: {
        title: `Test API`,
        version: '1.0.0',
        description: `Test API`
    }
});

const swagger = ui(swaggerSpec, "/swagger");

// 添加
app.use(swagger);
使用 Apifox 管理 API 文档
Swagger 管理接口有时很不方便,缺乏团队间的分享协作,所以我更推荐使用 Apifox。
Apifox 是一个比 Postman 更强大的接口测试工具,Apifox = Postman + Swagger + Mock + JMeter,Apifox 支持调试 http(s)、WebSocket、Socket、gRPC、Dubbo 等协议的接口,并且集成了 IDEA 插件。在开发完接口后,可以通过 Apifox 的 IDEA 插件一键生成接口文档,多端同步,非常方便测试和维护。
将 Swagger 导出为 JSON
如下图所示,选择“Convert and save as JSON”,将 Swagger 文档导出为 JSON 文件。

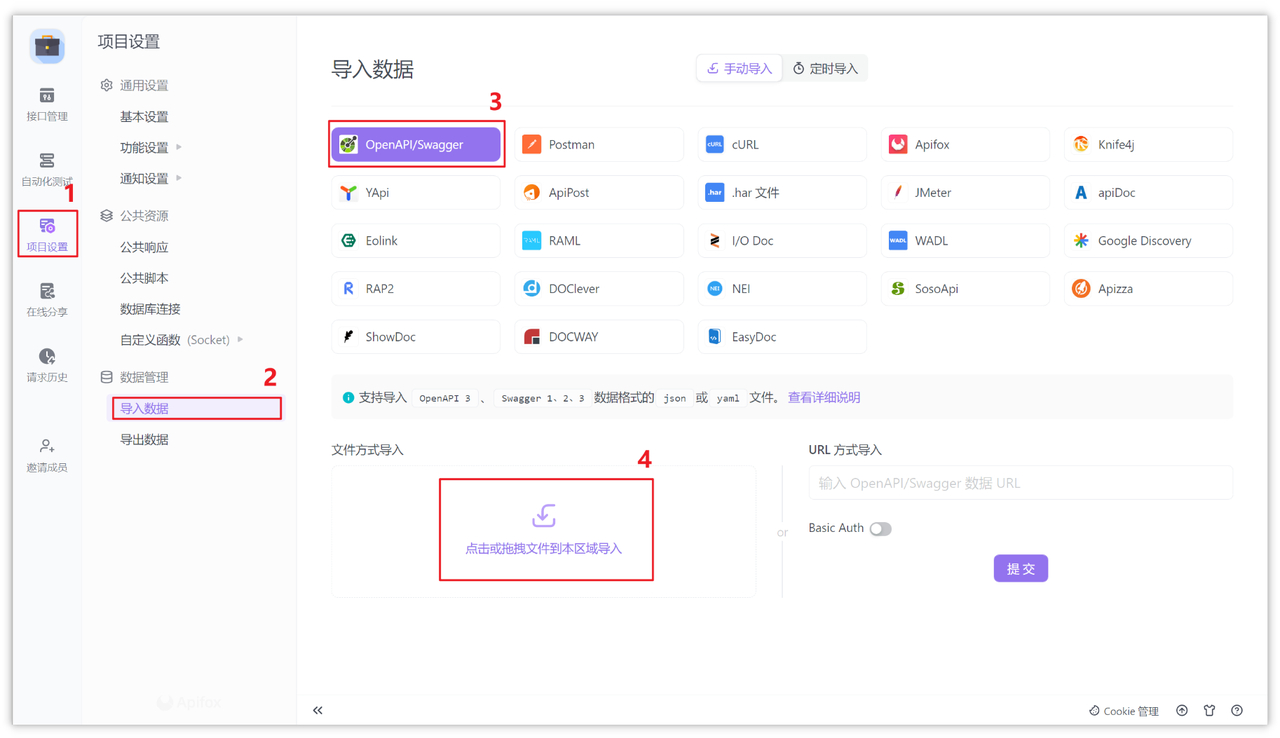
将 Swagger 文件导入 Apifox
打开 Apifox,创建一个项目后,选择“项目设置->导入数据->OpenAPI/Swagger->文件导入”,将已导出的 Swagger 格式的 JSON 文件导入即可。
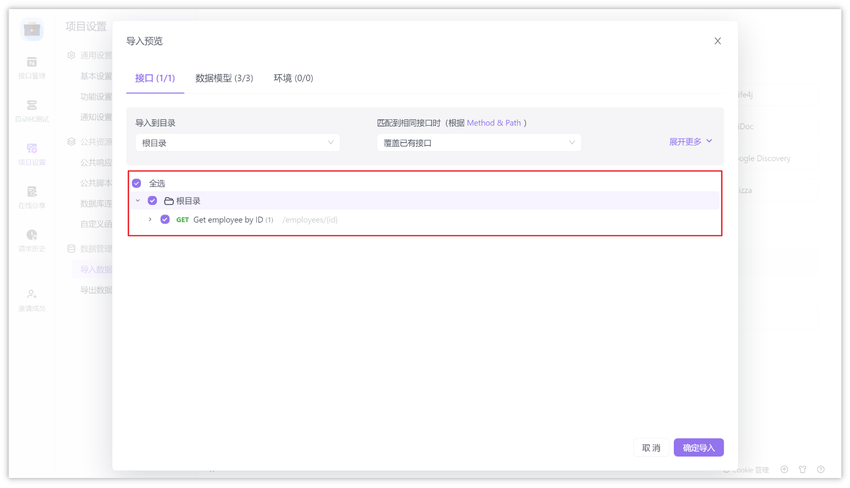
导入时,会有预览,可以选择导入全部,也可以选择性的导入接口。
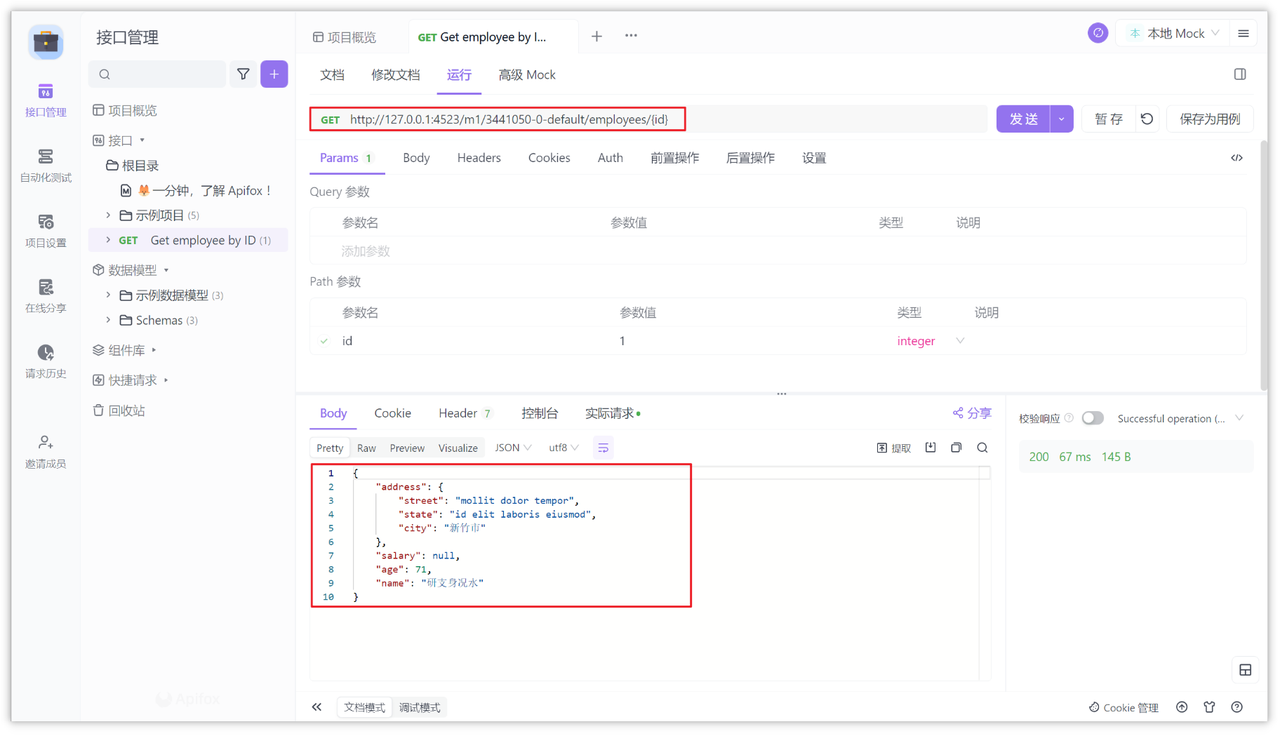
导入成功之后,就可以选择一个环境来测试接口。如下图所示,接口成功返回数据:
知识扩展: